Fall is one of my favorite times of year. The air is cooler, the leaves are changing and hopefully my Kansas City Chiefs and CU Buffs are doing well on the field. Plus there are all the things I love to cook this season.
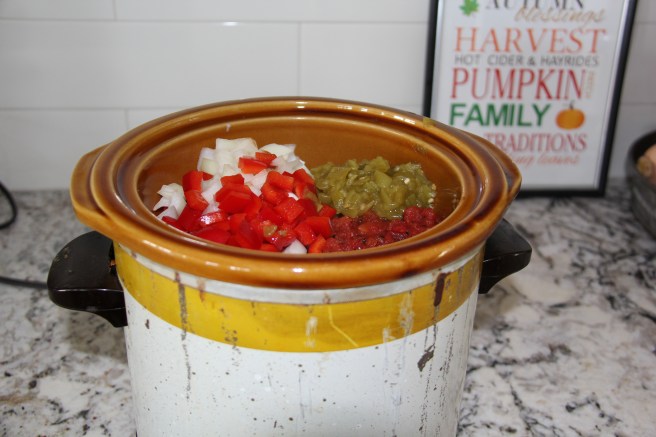
Chili is definitely something we have at least a few times a month October through the end of winter. This recipe is a blend of my mom’s recipe that I grew up on plus some additions that give it a Colorado touch (i.e. diced green chile peppers).
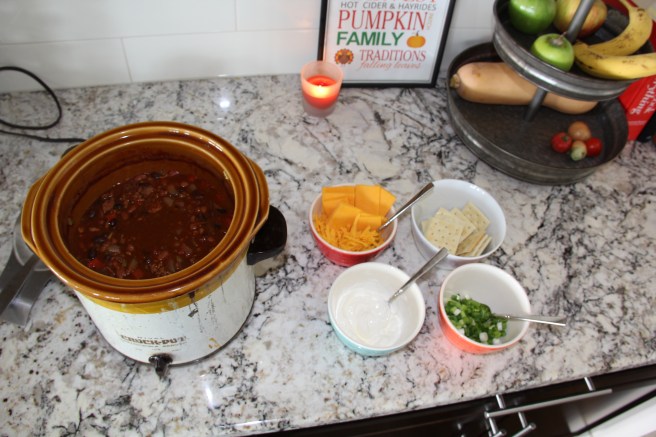
The final product
Ingredients:
1 lb ground beef
2 red peppers, diced
1 large yellow onion, diced
1 package chili seasoning (Williams seasoning is my favorite but it isn’t available in Colorado. Here is hoping I now have a few packets in my stocking when we go back to Kansas City for Christmas!)
1 15 oz can black beans, drained
1 30 oz can of chili beans
1 14.5 oz can fire roasted diced tomatoes
1-2 4 oz cans diced green chile peppers or 4-8 oz of fresh roasted peppers (I would use the hot version if cooking for adults and the mild version if cooking for kids.)
All easy to find ingredients.
Optional add-ins:
1 lb ground pork (I like to add an extra pound of meat when I am serving a crowd)
2 sweet potatoes, peeled and diced (This is a great way to sneak some additional veggies in.)
Toppings:
Sour cream
Diced green onions/scallions
Cheddar cheese
Saltine crackers
Recipe:
Brown meat(s)
While meat is browning, chop vegetables
Drain fat off of meat(s) if needed
Add chili seasoning to drained meat and cook for a couple of minutes
If the bottom of the pan gets crusty, add a little water or beer if you have a can open to deglaze the pan (You want all the seasoning making it into the crock pot, not sticking to the pan.)
Scrape meat and seasoning into crock pot
Add all vegetables to crock pot
Add all canned items to crock pot
Stir
Cook on low for 8 hours
Serve with toppings in bowls for people to add what they like
Very easy to put together.
And yes, I know my crock pot is hideous. See my crock pot chicken recipe for the explanation of why I keep it around.
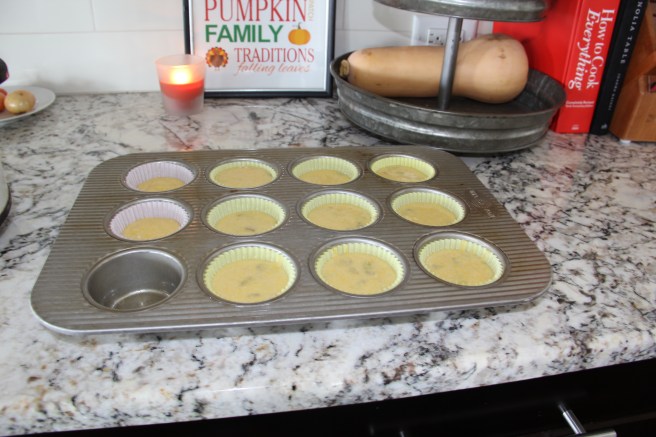
I typically mix the box following their directions and spoon out a couple of muffins worth into a muffin pan (these will be for the kids). Then I add a can or fresh green chiles to the mix and spoon out the rest of the batter into the muffin pan (these are for the adults). For those at high altitude, make sure to follow the high altitude instructions of adding a bit more milk and flour.
Now add some football and a cool night and you have a perfect fall evening meal!
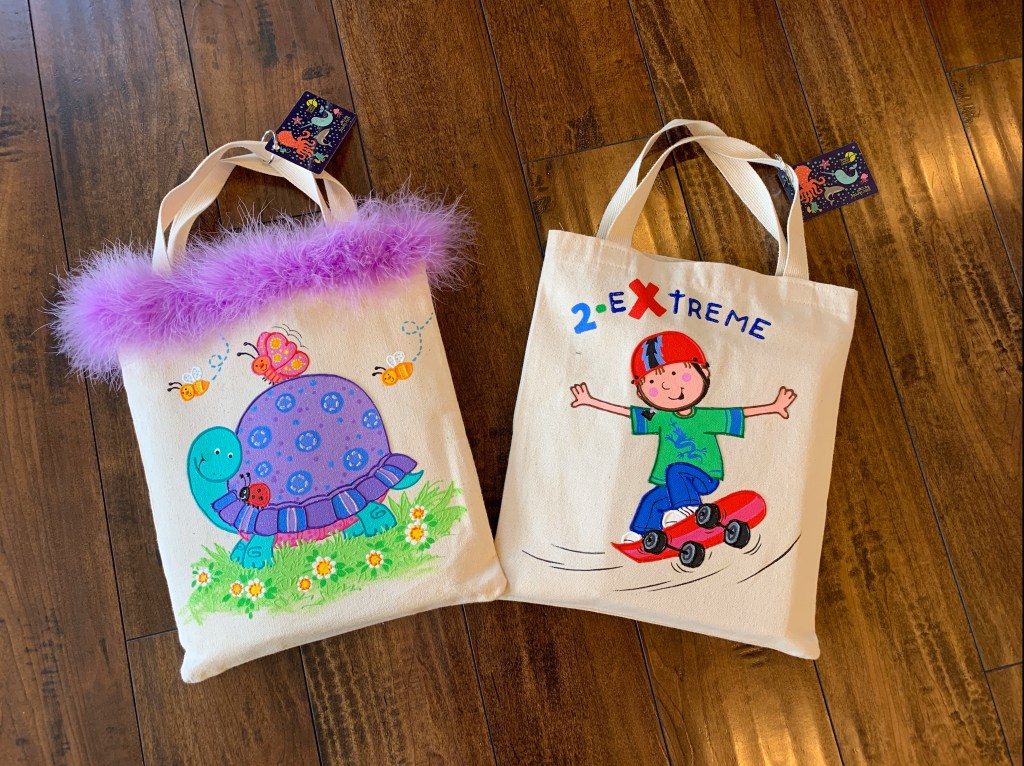
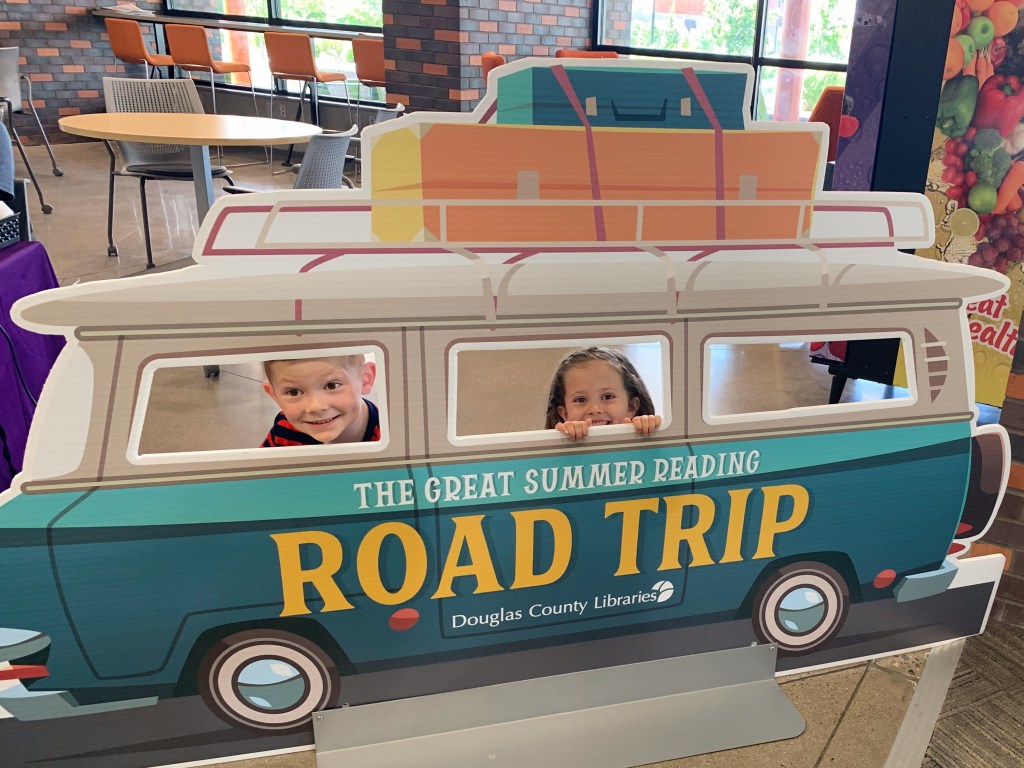
Ladybug and Bear’s library bags with library cards attached.
We are incredibly lucky to have a fantastic library branch in our county (Douglas County Libraries). They offer a summer reading program with lots of incentives to encourage kids to read more over the summer and all of their facilities are kid-friendly, cool spaces to beat the heat on super hot days.
While I absolutely love having library books in my house, I’m one of those people who doesn’t like the library books mingling with our own books. I live in constant fear of losing a library book for really no reason. When my mom gave the kids some new canvas bags we decided to use them as new library book bags but wanted to get the kids a bit more excited than they have been about previous bags.
I had them sign up for their first library cards and the summer reading program on the same day. A quick hole punch and a key ring let me attach the cards to the bags for safe keeping.
Now the kids keep their library books in the bags and usually have them hanging from their bed. When we go to the library they can use them to carry the books they want to check out. When it comes time to check out, they have their library cards handy and can easily check out their books by themselves. Our library has a pretty cool check out system where they literally can just place their bags on the check out desk and the system will know which books they have.
They have really loved being able to do the check out process themselves. I have loved having a dedicated spot for the books and not having library cards floating around.
This would be a great Easter basket gift or special outing for the start of summer. I hope you are having a great summer!
The other night I was planning on grilling my Chicken and Rainbow Veggies but a windy rainstorm thwarted my grilling plans. I pulled a quick switch to a one pan dinner. What really makes this meal is the grated fresh ginger. You can read about how I easily always have ginger on hand here. It is really easy to grate when it is frozen.
Ginger-Hoisin Chicken prior to going in the oven.
Ingredients:
4-6 chicken thighs
1 cup broccoli (florets cut from crown)
1 cup carrots (cut in long pieces)
2 small or 1 large zucchini (cut into half-moon chunks)
1 cup snap or snow peas (with ends trimmed)
1 Tablespoon garlic (minced)
2 Tablespoons ginger (grated)
1/4 cup prepared Hoisin sauce
Drizzle of olive oil
Salt and pepper
Optional add-ins: Red or other bell peppers, bok choy, or other vegetables you have on hand.
Recipe:
Pre-heat oven to 400 degrees.
Chop all vegetables
Mix chicken thighs, vegetables, and garlic in an oven-safe pan with hoisin sauce, drizzle of olive, and salt/pepper to taste.
Push the chicken thighs to the bottom of the pan.
Grate the ginger over the top of the chicken and veggies making sure each items gets a little bit of ginger.
Cook for 25-30 minutes.
Serve over steamed rice or alone. Red chili paste and soy sauce make good condiments.
Baking just 25 minutes leaves the veggies with a bit of crispness still left, which is the way we like them in our house.
This is a great way to get a variety of veggies in front of my family quickly and I hope it works for your family as well.
Making popsicles was on our summer to do list. One off day when I happened to have a watermelon on hand I went searching for a watermelon popsicle recipe. I found this gem: Strawberry Watermelon Ice Pops from Super Healthy Kids.
To make them just a little extra lemony, I zested the lemon prior to using the juice and put all of the zest in the mix.
I poured the mix in the kids’ popsicle freezer molds and had a little bit extra left over. I poured the remaining mix in an ice cube tray and stuck some popsicle sticks in. Now we have some mini popsicles on hand as little treats that have been perfect for after dinner. And enjoyed by kids and parents alike.
There was a little extra leftover after that so I decided to go ahead and freeze in it a plastic cup for thawing later. I’m thinking on our next pool day I’ll be blending that with some rum for a quick daiquiri. Moms need treats too.
I have not posted in a bit for a variety of reasons. Summer time for us was filled with lots of pizza at the pool and grilled chicken and whatever veggies and fruit we have while soaking up some time outside. (I also made this Lemony Orzo dish about 15 times.) I have a couple of little writing projects going on in my “free time.” We also did our first driving vacation which included camping in Yellowstone and driving all the way to the Oregon coast and back.
The biggest reason for me not writing was that we also started having sports and other activities in the evenings after pre-school and pre-K for Ladybug and Bear. This has added an extra layer of complication for a working mom: how do you get dinner on the table by 7 pm when you are gone from 7:30 am to 6:45 pm?
My solution: CROCK POT CHICKEN
Confession: My crock pot it hideous. It is literally the crock pot MY PARENTS registered for before their wedding. BUT, it works and has a great low setting that truly is low where some of the newer models I have tried and returned are just too hot at that setting. My parents joke that they are going to steal it back one day because they miss it. And yes, I have heard about the crock pot in This Is Us but really that was the towel’s fault, not the crock pot. Right?One day, I will upgrade but until this gem kicks the bucket, I think I’m good.
1980’s finest.
Crock Pot Chicken has become the Tuesday regular at our house. Throw a few chicken breasts and other odds and ends you have on hand in the crock. Turn it on in the morning and when you walk in at dinner time, dinner is basically ready. Here is the basic recipe and I will give you some different variations to try as well:
The night before:
Set 3-4 chicken breasts out to thaw.
Set crock pot out and put two cups of liquid in.
Add any additional ingredients, seasonings, and salt and pepper.
Cover the crock with the lid.
In the morning, put chicken in the crock, cover, and turn on low.
When you get home:
Take the chicken out of the crock pot and put on a plate to cool.
Get dinner fixings ready.
Shred chicken and serve.
Keep in mind that these recipes can easily be made Whole 30 compliant if you just use approved ingredients. Leaving out the cheese and using lettuce cups instead of bread or tortillas are very easy ways to make these meals compliant.
Our favorite variations:
Chicken Salads: For the liquid, use 1 cup water or chicken broth and 1 cup Italian dressing. Cook all day. Shred and serve with greens, carrots, other veggies, and croutons.
KID TIP: YES, my kids eat salads. And yours can too. Start by putting a small amount of salad on their plate (think one piece of everything in the salad) and a little bit of a dressing they like (like Ranch) on the side. Even if they do not eat it much or any of it at first, they will get used to seeing it on their plate. Gradually, you can ask them to try a bite and eventually increase the amount on their plate. See my thoughts on creating fabulous little eaters here.
Chicken Tacos: For the liquid, use 1 cup water or chicken broth and 1 cup orange juice. Add 1 Tablespoon of chili powder and 1 teaspoon of cinnamon. If you have an orange, cut it in slices and add the slices to the crock on top of the chicken. Cook all day. Shred and serve with hard shells, tortillas, or lettuce cups; shredded cheese; sour cream; and other taco fixings.
Chicken Nachos: Cook as above for Chicken Tacos. When you get home, pre-heat oven to bake at 400 degrees. Shred chicken. On a large, oven safe baking dish, layer tortilla chips, shredded cheese, shredded chicken, and various toppings (diced green chilies, sliced jalapeños, black beans, etc). Bake for 10 minutes. Add an additional layer of shredded cheese and broil for 3 minutes. Top with diced avocado, diced tomatoes, sour cream, etc.
Chicken, Rice, and Veggies: For the liquid, use 1 cup water or chicken broth and 1 cup Italian dressing. Add chopped carrots, onions, celery, and/or other veggies. Cook all day. Shred the chicken and put it back in the crock with the liquid and veggies. Microwave some instant rice and separate it into bowls. Spoon the chicken, veggie, and sauce mixture over the rice and serve.
Barbecue Chicken Sandwiches: For the liquid, use 1 cup water or chicken broth and 1 cup of your favorite BBQ sauce. Cook all day. Serve on buns with a side salad or steamed veggies.
Curry Chicken: For the liquid, use a pre-made curry sauce and add a little water, if needed, to get 2 cups. Add chopped carrots and onions. Cook all day. Add 1 cup of frozen peas to the mix when you get home. Microwave some instant rice and separate it into bowls. Shred the chicken and add it back to the mix. Spoon over the rice and serve.
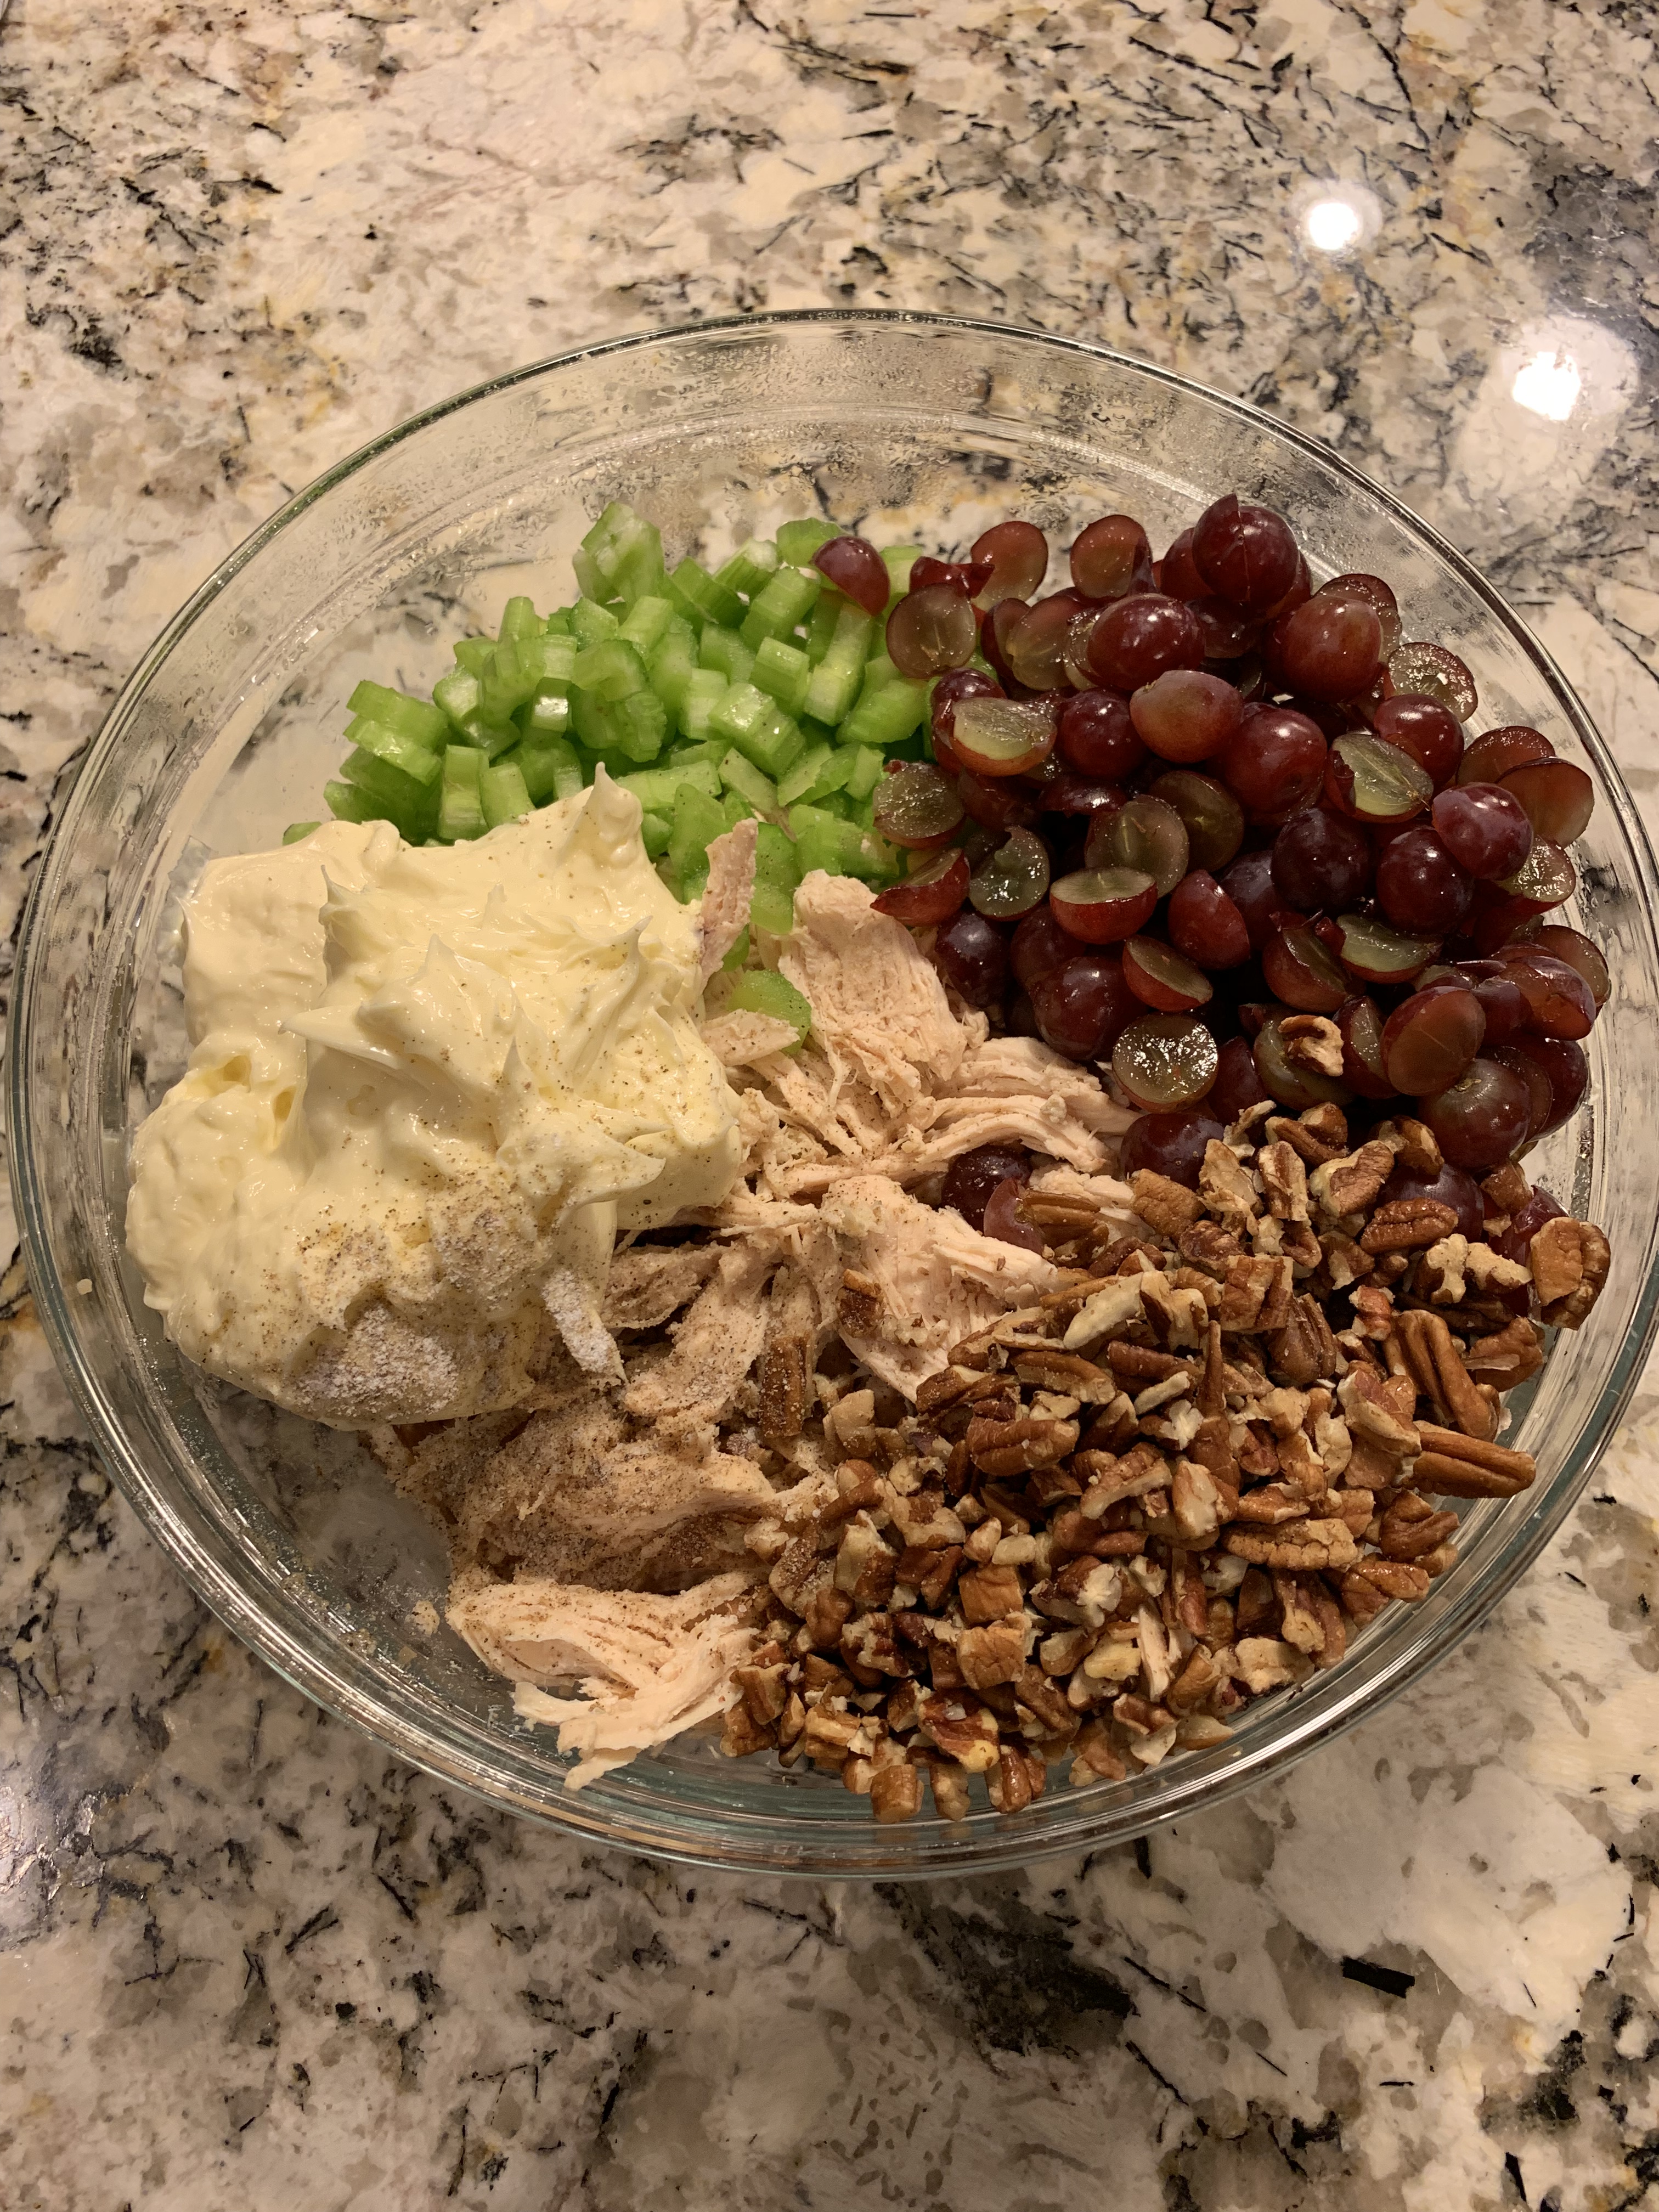
Chicken Salad Sandwiches or Lettuce Wraps: For the liquid, use water or chicken stock and cook chicken the day or night before you need it. Put the cooked kitchen breasts in the fridge. Shred the chicken when you get home and mix with the following: 3 stalks celery (diced), 1 cup dried cranberries, 1-2 cups red grapes (halved), 1 cup walnuts or pecans (chopped), 2 Tablespoons lemon juice, and 1 1/2 cups mayo. Serve on lettuce wraps or toast.
I hope this gives you something to have in the rotation for those nights when you have no time but you still want to get something healthy and good on the table. It isn’t fancy, but it does the trick!
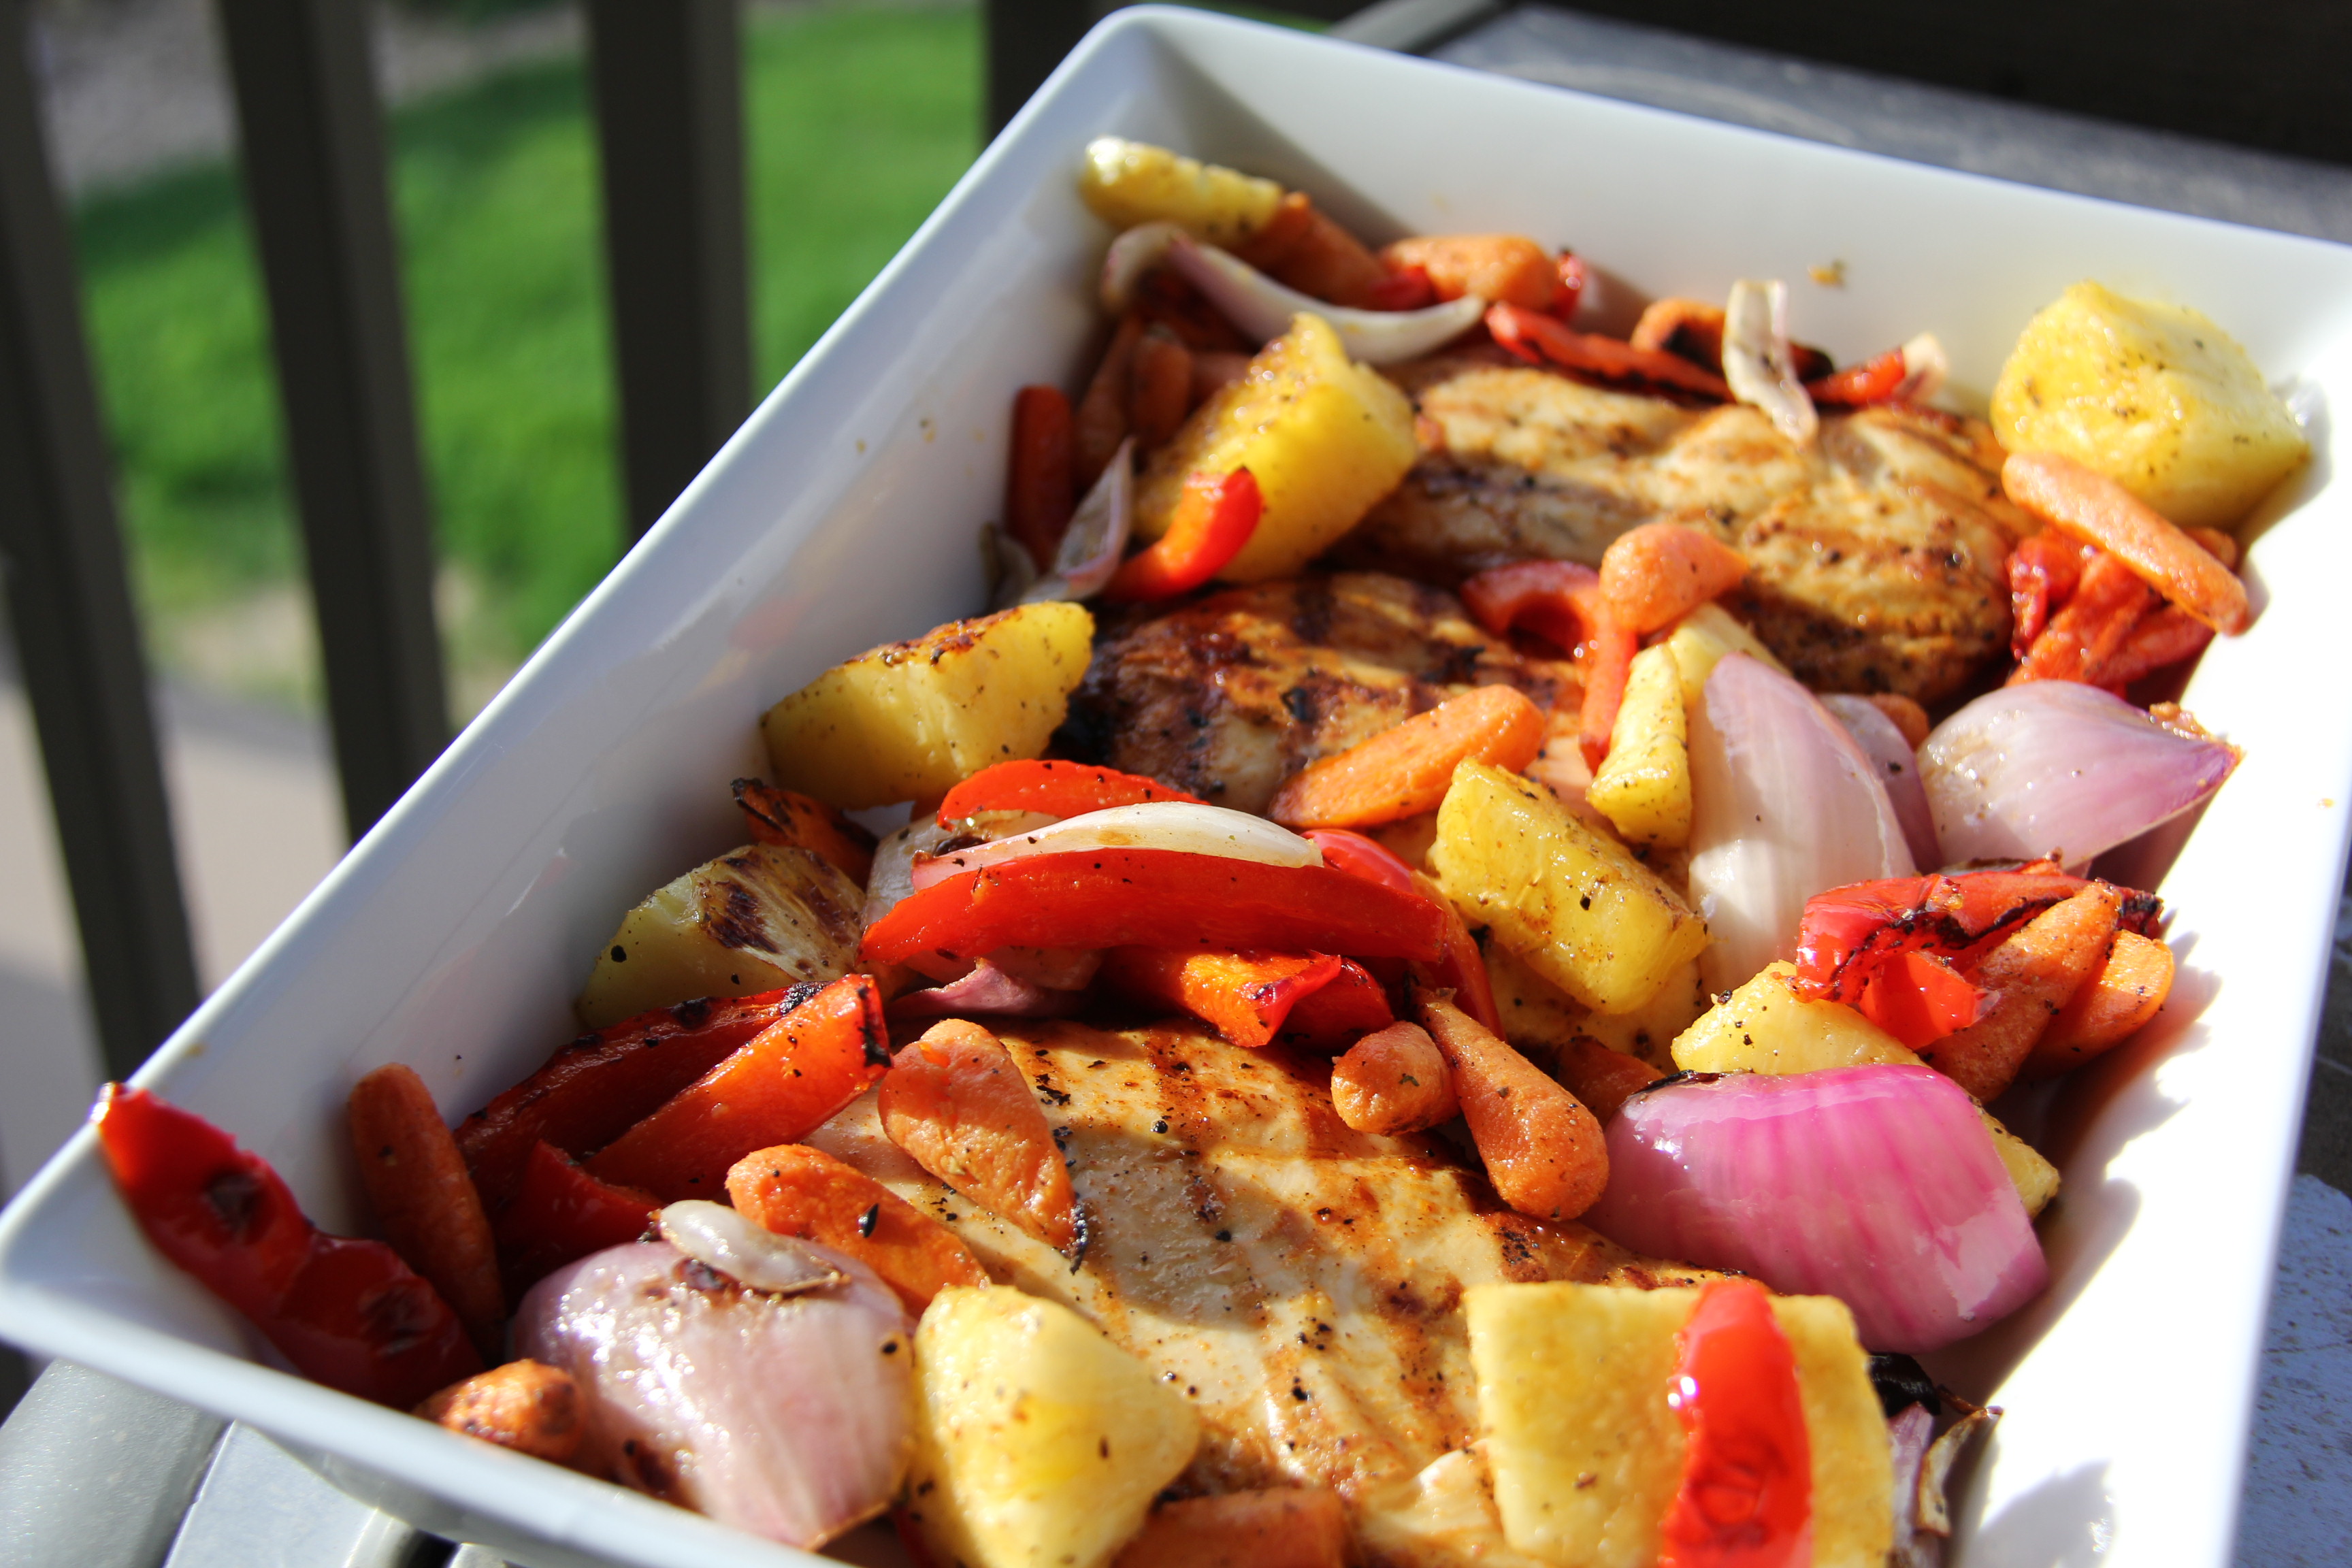
I always look forward to grilling season so I have an excuse to do two of my favorite things together: 1) get outside and 2) cook. I use our propane grill for dinner at least a few times a week once the weather is warm. Now I know there are some purists who think propane grills aren’t the real deal and swear by charcoal. For me, charcoal grilling is for weekends and special occasions. My propane grill works just fine when I have 30 minutes to get dinner on the table!
This recipe is a favorite of mine because it can be made any number of ways simply by changing the seasoning/sauce and or the veggies. I often use this as a clean out the fridge dinner to use whatever small amounts of various fresh items I have leftover from the week. My kids like the name and it encourages them to “eat the rainbow” of different items on their plates.
I often try to sneak a little fruit in here too (either pineapple or peaches). Grilled fruit just feels like summer to me and sneaking some sweet bites into any recipe will always be a winner with kids. KID TIP: “Accidentally” only get one piece of fruit in the scoop of veggies and fruit you give your kids. When they of course eat that first and ask for more, tell them you’ll give them another piece of fruit when they eat one of each of the other colors in the rainbow. This encourages them to try different things and makes sure they aren’t only eating the sweet bits.
Grilled Chicken and Rainbow Veggies
by Mel from Served With Love (in Colorado) May 25, 2018
Ingredients:
3-4 chicken breasts
1 red (purple) onion, cut into large chunks
1 cup carrots, cut into large chunks
1 red pepper, cut into large chunks
1 cup fresh pineapple, cut into large chunks
Drizzle of olive oil
Seasoning mix or sauce of your choice for veggies and meat
Salt & pepper
Ingredients above are for the night pictured. I normally would love to have some green in there and zucchini would be my go-to but I didn’t have any on hand for this night.
Other ingredients you can use:
1 yellow onion, cut into large chunks
1 yellow or green zucchini, cut into large chunks
2 broccoli heads, cut into individual florets
1 yellow or orange pepper, cut into large chunks
2 peaches, peeled and sliced
Really just about any veggie that you can cut into a big chunk will work! Just rummage around your fridge and get all the one off fresh ingredients you have.
Seasoning or sauce mix ideas:
Anything that smells good to you from your local spice shop!
Blackened seasoning
Garlic salt
Barbecue rub
Barbecue sauce (chicken)
Italian dressing (chicken or veggies)
Instructions
1. Get the kids outside and tell them they can come in when dinner is ready.
2. Open a cool beverage of your choice. You’ll need something to enjoy while you’re in front of the grill.
3. Preheat grill to medium high. Have your grill vegetable tray on there so it can get sizzling hot as well. The tray I use is similar to this one.
4. Prepare chicken breasts. My preferred method is to put the chicken breasts, a drizzle of olive oil, salt, pepper, and 1-2 tablespoons of seasoning mix in a gallon size ziplock bag then beat the chicken to about 3/4 inch think with the back of a ladle. (You can watch me and my kids do this here. Seriously, every time my kids see me with a bag of chicken and a ladle, they go and get theirs to “help.”) For the night pictured, I used a Cajun Blackened mix for the chicken.
5. Massage the seasoning and oil mix all over the chicken to make sure every little nook and cranny is covered.
6. Prepare the veggies and fruit. Cut all the veggies and fruit into large chunks and throw them in a bowl.
7. Add a drizzle of olive oil, salt, pepper, and 1 tablespoon of seasoning mix. For the night pictured, I used a simple garlic salt mixture for the veggies and fruit and didn’t add any extra salt. Since the blackened seasoning was pretty strong, I didn’t want to use it on both the chicken and the veggies. If you have a favorite mix that is pretty potent, try using that on the chicken and then something simpler/milder on the veggies/fruit.
8. Mix the veggies and fruit.
9. Bring your meat, veggies/fruit, and cool beverage to the now perfectly sizzling grill.
10. Throw the chicken one one side and the veggies/fruit in the tray on the other.
11. Flip the chicken once it easily releases from the grill (usually 5 minutes). This really varies based on the temperature of your grill.
12. Stir the veggies/fruit when you flip the chicken. Do not over stir! You want there to be grill marks.
13. Take the chicken off after the other side easily releases from the grill (again about 5 minutes) and put on a large serving tray.
14. Let the chicken rest while the veggies get to your desired level of doneness (for us, just an additional minute or two).
15. Scoop the veggies and fruit on top and around the chicken.
16. Call the kids in and serve.
Details
Prep time: Cook time: Total time: Yield: 4-5 servings
I hope you enjoy your time outside by your grill, cool beverage in hand!
This weekend I got it in my head that I needed to make homemade tartar sauce (and therefore mayo) for a fish fry we were planning. I was short on time so I thought I could skip over the recommendation for all of the products to be room temperature. “Eh, it will probably just take a little more elbow grease to whip cold eggs into mayo,” I thought. Wrong. Cold eggs do not whip into mayo. They whip into useless oil and egg liquid. Or so I thought.
“Now what?” I was thinking looking at a $5 or more in oil, eggs, and fresh lemon juice that was looking like it just needed to get thrown out. Thankfully, I remembered a recipe I had seen but never tried for olive oil cake. I quickly pulled it up and realized that I could throw a few ingredients into my oily mess, bake it, and call it a planned cake. So I did and it turned out just fine even though the ratios I had in my oily mess weren’t even exactly what the recipe called for.
The next day, I tried a different mayo recipe and let the ingredients come to room temperature. I wasn’t going to let homemade mayo stump me. This time: Perfection. I then mixed in some dill and finely diced cucumber and had a fresh tartar sauce that was delish.
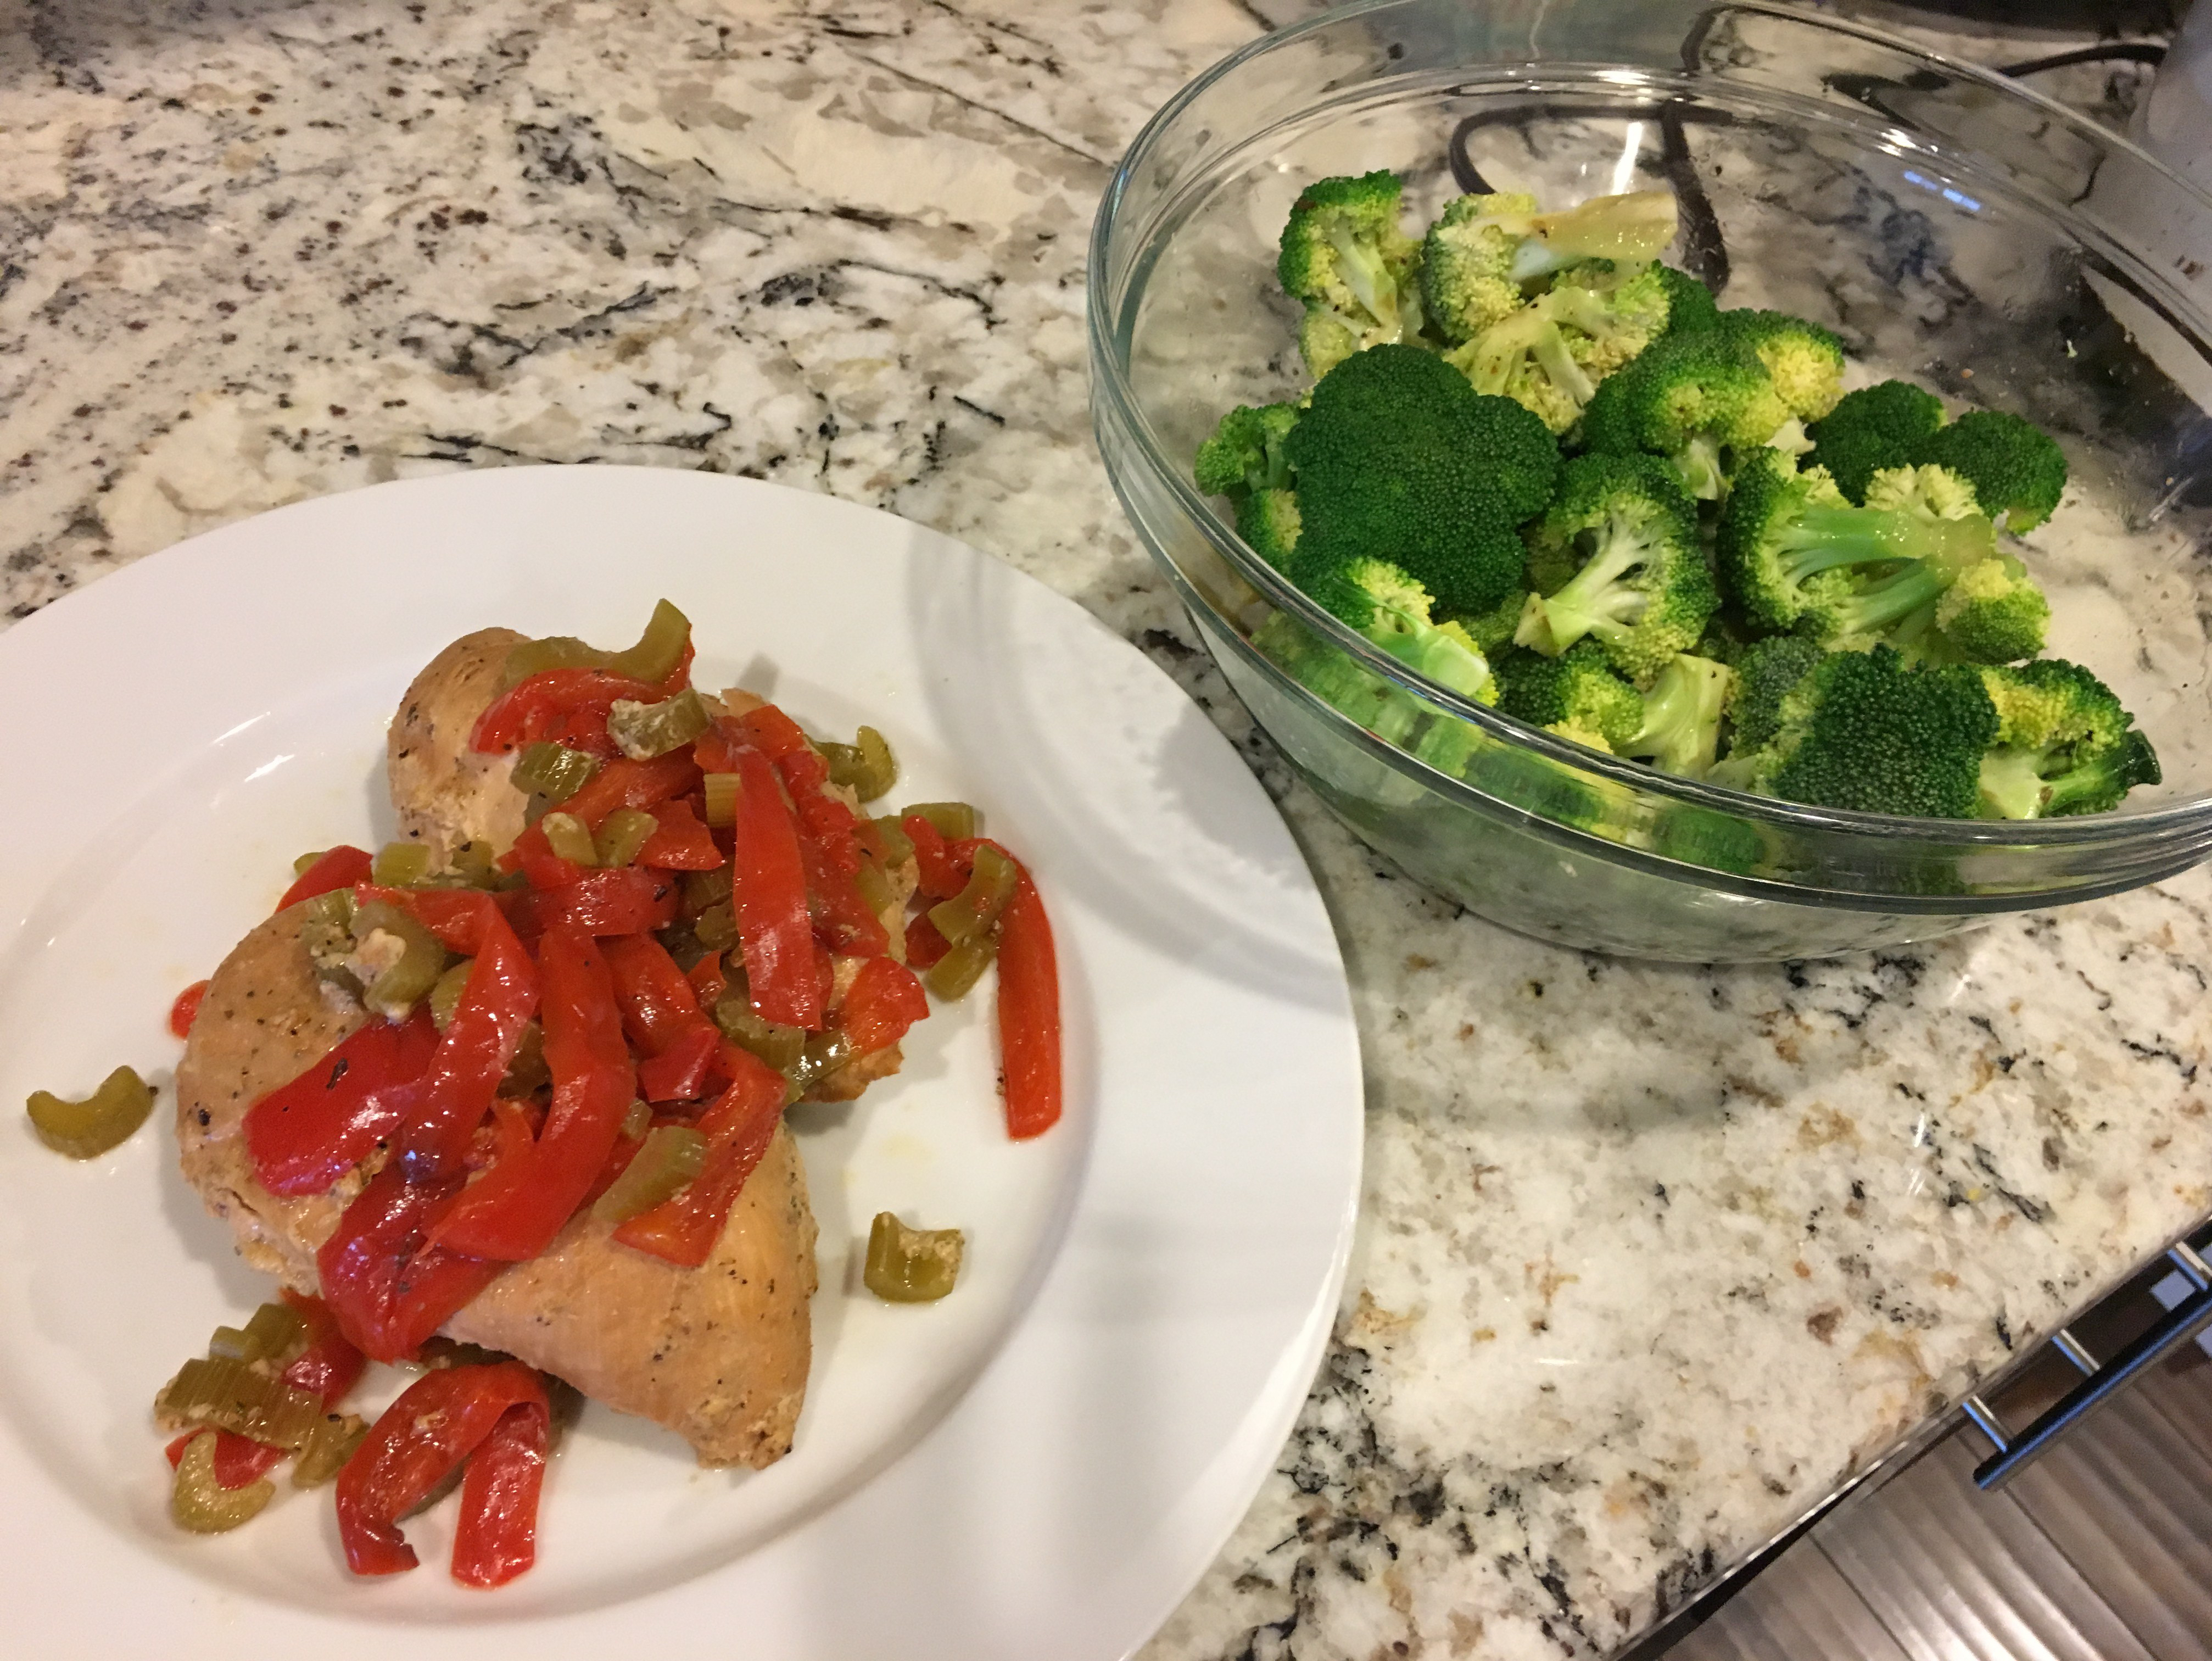
Last week I made something delicious. It was also appalling to look at. I share this story in order to show that even people who like to cook and think they are pretty ok at it still have meals that don’t go so well. Ultimately, these are meals you learn from and get better because of. All you can do is laugh and try again the next meal.
Beast was out of town for a few days last week so I was trying to make a healthy meal that would be super easy. And I was craving something that tasted like fall. Pork chops, sweet potatoes, apples, and cider were on hand so I was planning to make my Cinnamon Apple Pork Chops but thought maybe it would be even easier if I put it all in the crock pot instead.
Yes, this was easy. Yes, it tasted fabulous and the pork chops were super tender and tasty. But… Sweet potatoes and apples when left in a crock pot for hours become a not so attractive mush of orange and brown. I’m sparing you from a picture on purpose but I’m sure you can imagine it.
Bear, who eats EVERYTHING, looked at the plate I put in front of him and without so much as smelling my foul appearing concoction said, “I don’t think I like that.” Well said, my son.
He and Ladybug both did try it and both did eat it well because after you got over the visual appearance, it really did taste exactly how I wanted it to: sweet and cinnamony, tender and juicy.
Now there was plenty leftover but I could not imagine myself actually pulling these leftovers out of the fridge and thinking, “Mmmm, yeah that looks good.” I also could not imagine throwing a whole pork chop and bowl of veggies away simply because they looked bad. So our dog, Charlie, ate well the next two meals.
Next time, I’ll put the pork chops, onions, cider, and spices in the crock pot and leave the sweet potatoes and apples for cooking later. Once again a reminder that we first eat with our eyes and the appearances of our meals are important. I’m sure Charlie is hoping I forget that fact again soon.
Y’all, I had a complete tantrum the other day. Seriously. A full on toddler-esque tantrum. What caused it? My pantry.
I wish I had a “before” picture for you but this description may be enough to help you understand the chaos that had become our food storage. I went to grab something up high and a glass vase and lightbulb fell down on me. The glass vase I ninja-like shoved into a shelf mid air by sheer luck and the light bulb hit a nice soft landing on my bare foot.
This was while my children were eating breakfast. Before they were done the entire pantry was emptied onto the kitchen counters and island.
The problem: We had so much random crap in our pantry that it has ceased to become the place dedicated to dry food storage. It truly had become a dumping ground.
The solution: Full decluttering with putting the non-food away where it goes and a trip to IKEA. A hilarious trip with two toddlers where the stroller became a shopping cart and Bear became my assistant.
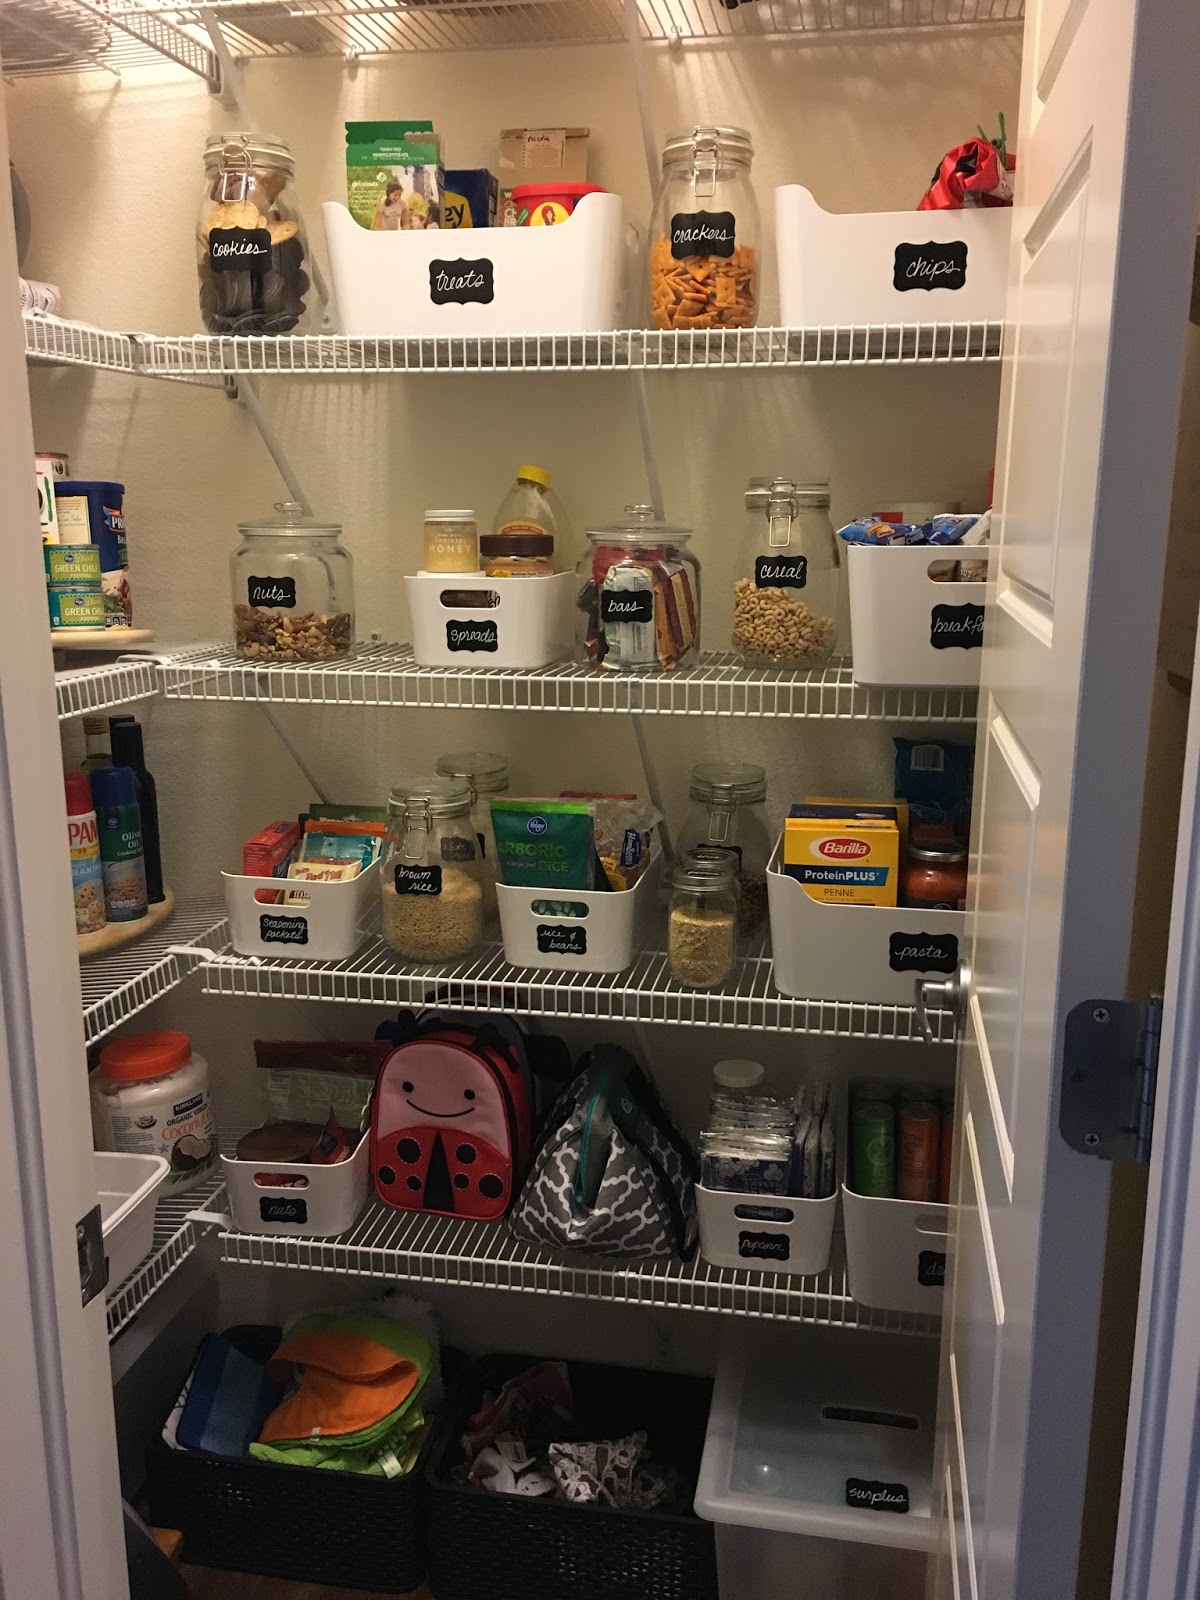
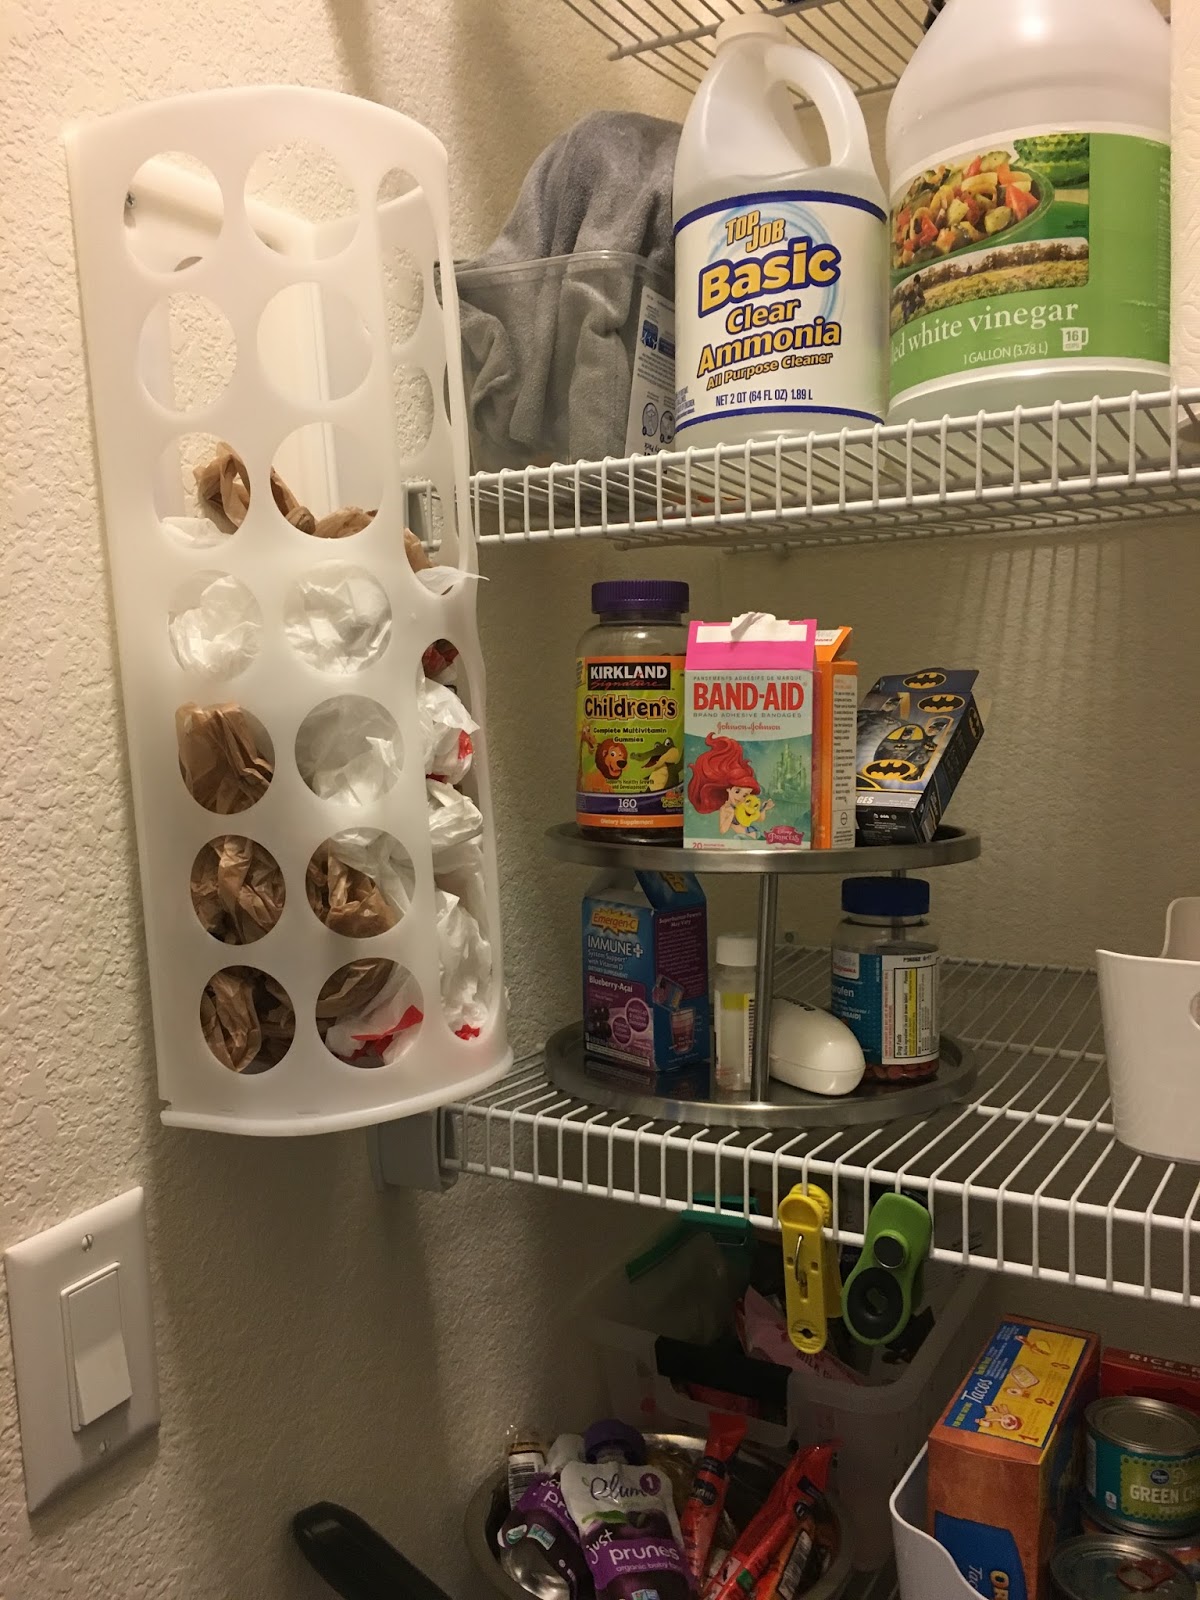
Here are the “afters” and then I’ll tell you the process and products that worked for me.
Now Angels sing when I open this door.
A spot for everything and everything labeled to tell the individuals who dump things in here that “Oh no! That doesn’t go here.” (Basically that is a note to Beast. And me. Mainly me.)
“This week” bin for items that are claimed for meals I’ve already planned. This helps when you go to the store. I know I need more of X because while I have one in the pantry, it will be gone before the end of the week.
Lazy susans for the oils and cooking products. Perfect in these deep corners of the pantry that if I put things in there, would disappear. I kid you not, I found 18 breakfast bars of various types pushed back in the recesses of these corners. No more.
Several large, rollout bins for the floor that have rarely used or surplus items. I have one for baking items, vases, and surplus. Surplus has an extra bag of sugar (again found in one of the back corners), one of those half giant bags of rice from Costco, etc.
Not so healthy stuff up top so it is not at Ladybug and Bear’s eye level. And now I can have one jar of cookies and one jar of snack crackers. I don’t need 3 half empty boxes.
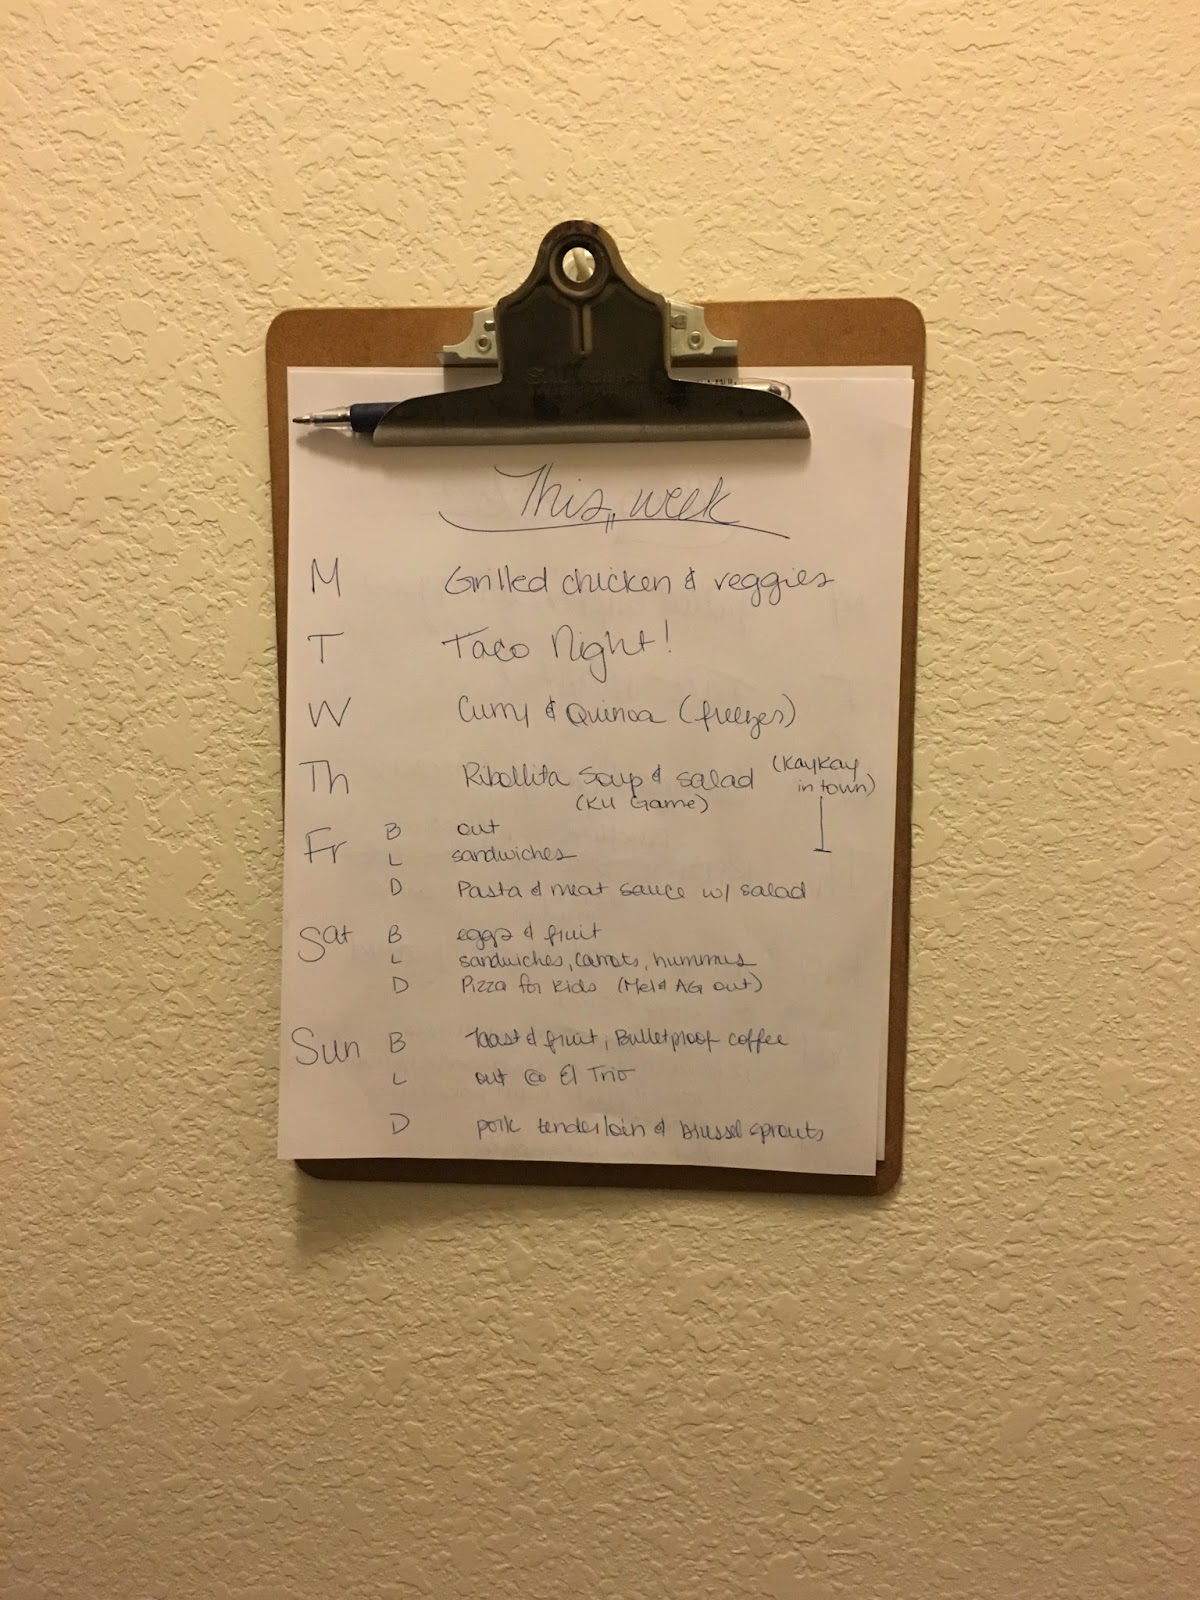
My meal planning clip board is behind the door and removable. More on meal planning here. Perfect for those occasional nights when Beast beats me home. He knows what I was planning and can get it started. And I always know where to find it when I am ready to plan.
So here is how I did it. I bought 8 bins (4 small, 4 big) initially and then went back and bought 4 more (2 small, 2 big). I bought 5 jars initially and then went back and bought 3 more. I already had a few bins and one small lazy susan on hand.
Here is what I have my items divided into:
Lazy susans:
1) Canned goods
2) Oils and vinegars
3) Kids vitamins, medicine, band-aids, and my ibuprofen
Jars with removable glass lids:
1) Snack nuts
2) Breakfast bars
Jars with sealable lids:
1) Cookies
2) Snack crackers
3) White rice
4) Brown rice
5) Lentils
6) Cereal
Large pull out bins for ground storage:
1) Vases
2) Surplus
3) Extra baking items (rarely used)
Large bins:
1) Potatoes
2) Onions
3) Drinks
4) Pasta/sauce
5) Breakfast
6) Treats
7) Chips/crackers
8) Baking (regularly used)
9) This week
Small bins:
1) Stock
2) Spreads
3) Seasoning packets
4) Rice/beans
5) Nuts
6) Popcorn
Mason jars:
1) Chia seeds
2) Quinoa
As I said, I pulled everything out, put the stuff that didn’t belong the other places in the house where it ACTUALLY was supposed to go, and then started putting everything back in.
I used this time to get rid of the junk that we didn’t need like a bunch of old candy and expired items. Then we lived with it. I went to get a few more items when I realized I had the space and wanted to separate out a few more items.
After I was 100% sure that I had everything separated out how I wanted them, I labeled everything. I used chalkboard labels and a white paint sharpie. Bought from Amazon Prime, of course. Laminas labels and a Sharpie marker. The labels peeled off really easy if I needed to move them a little bit and the paint marker wiped off when wet really easy which was important since it took me two times to figure out that I was actually spelling “quinoa” right. It just looked really wrong.
I’m super happy with how everything turned out. My fit was worth it!