Mama G’s Apple Pie

Fall coming around always makes me excited for several reasons:  Cute layered outfits, boots, Chiefs football, Buffs football, and baking anything and everything.  This year we had another thing to be excited about: apples.IMG_6976

We planted an apple tree a couple of years ago and this was the first year I was supposed to leave a few of the flowers so fruit could actually grow.  The lovely folks at my favorite garden center told me to pick 100% the flowers the first spring, 75% the second spring, 50% the third and so on.  The reason for this is so that the tree can use its energy to put down solid roots instead of growing fruit.  Even after picking 75% of the flowers off this year we had gobs of apples!  This means that I have been able to work on my apple pie recipe…

IMG_3876
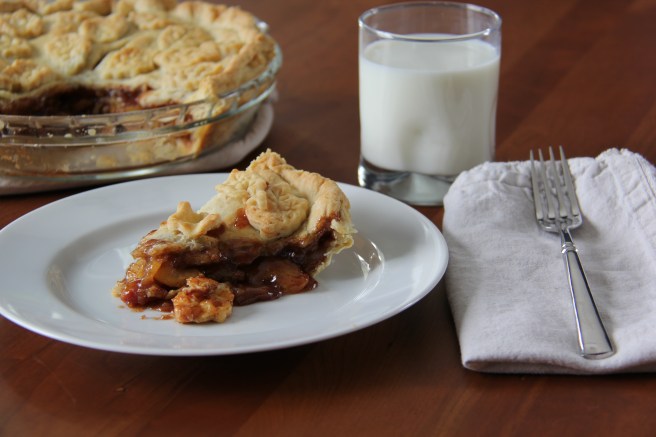
I like a classic, flaky crust that is not too thick and an apple mixture that has a good amount of spice to it.  I also like the apples to be cut nice and thin so that they stack up together and stay in place while you are enjoying a slice.  Random thing that drives me crazy: When you take a bite of pie and the giant apple quarter comes out in one piece with the crust just collapsing on everything.  I want the perfect combo of apple and crust in every bite.

When it comes to crust, I do not think you can beat the King Arthur Flour Recipes:

Double Crust Recipe here.

Single Crust Recipe here.

I use the double crust recipe for this pie.  My kids love helping with the “squishy part” which is what they call squeezing the shortening and butter into the flour.  For my fellow Coloradans and others at high altitude/dry climates: I find myself adding much more water to this recipe than what is called for.  Just keep adding a tablespoon at a time until it all comes together without being sticky.

IMG_3835
Yes, we sometimes bake in PJs and dress up attire.

Now for the apples…IMG_3840

Ingredients:

  • 5-6 apples depending on size
  • 1 Tablespoon cinnamon
  • 1/8 teaspoon ground cloves
  • 1/2 teaspoon ground ginger
  • 1/2 teaspoon ground nutmeg
  • 1 cup sugar
  • 1/4 cup flour

This slideshow requires JavaScript.

Recipe:

  1. Make the crusts first as directed in the recipe above, wrap them with plastic wrap, and put them in the fridge to cool.
  2. Preheat oven to 425 degrees.
  3. Peel, core, and thinly slice the apples.  I like to use my apple corer/peeler/slicer to do this all in one step.
  4. Cut the apples in half.  Apples come off my corer/peeler/slicer looking like a whole apple.  A quick slice from top to bottom makes perfect thin slices.
  5. Mix the apples, spices, sugar, and flour in a bowl.
  6. Roll out your pie crusts and put one in the pie dish.  I like to use a silicon mat and plastic wrap to make this easy and to keep the dough from sticking to the counter or rolling pin.
  7. Paint the first crust with an egg white.  This keeps the bottom from getting soggy.
  8. Dump the apple mix in the pie crust and push the apples around to make sure there are not any empty pockets.IMG_3862
  9. Top the apple mix with the next pie crust.
  10. Seal the edges of the crust.
  11. Cut a few slits in the top crust.  I like to top my pies with a few crust cut outs and the kids really enjoy helping with this part.  You could use small cookie cutters but I love these little crust stampers.

  12. Cover the pie completely with foil.
  13. Bake for 30 minutes then turn temperature down to 375 degrees and remove foil.
  14. Bake for 30 minutes uncovered or until crust is golden brown.
  15. Let cool for 5-10 minutes then serve with ice-cream, whipped cream, or just by itself.  Enjoy!

IMG_3886

Happy Cooking!

Mel

Advertisement

Roasted Root Veggies with Rosemary Chicken

This recipe is based on one of our favorites from the Whole 30 Cookbook.  I adapted it to use ingredients I’m more likely to have on hand (bacon instead of pancetta), to use only one pan (because why dirty two?), and to use radishes that I can grow in my garden (the little color pop they give is really pretty).  This is a perfect fall or winter work night dinner.  Yes, you’ll need about 15 minutes or so to chop the veggies but that is really all the hands on time necessary.  Then you have 30 minutes (while the one pan dinner cooks) to play with the kids or do whatever else you need to.

When roasting chicken, I prefer chicken thighs but I have included information in the recipe on how you can use chicken breasts if that is all you have on hand.  If you are using chicken breasts for this recipe, check out how I make my chicken breast so much better by beating them.

This recipe calls for 1-2 pieces of bacon.  You might be thinking, “Why would I open a whole pack of bacon for one piece?”  But that’s not what I do most of the time.  If we have bacon sometime during a weekend for breakfast, I frequently hoard a piece or two in a plastic baggie to cook with the rest of the week.

If you see radishes on the ingredient list and think “I’m out” please hear me out: roasted radishes taste completely different than raw.  They have a much milder taste when cooked that is very similar to other root vegetables.  I learned this when a good friend was telling me how she steams her radishes with butter for her kids who eat them faster than she can make a second batch.  I’d basically avoided radishes since was a kid up until she told me that.  And those cooked radishes were apparently a gateway into radish loving for me because now I can’t get enough of them, cooked or raw.

So try it out and let me know what you think!

Happy cooking!

IMG_3287

Roasted Root Veggies with Rosemary Chicken
This one pan dinner is perfect on a fall or winter work night. If you don’t have bacon, substitute olive oil. If you don’t have fresh rosemary or a lemon, salt and pepper will be just fine. (But the lemon and rosemary do make it extra special.)
Ingredients
  • 1 peeled sweet potato
  • 1 peeled rutabaga
  • 2 carrots
  • 2 parsnips
  • 1 small onion
  • 1/2-1 bunch, depending on size/preference radishes
  • 1-2 slices bacon
  • 3-6, depending on size chicken thighs or breasts
  • 1 Tablespoon fresh rosemary
  • 1 lemon lemon zest
  • 1 garlic clove
  • salt
  • pepper
Instructions
1) Preheat oven to 400 degrees
2) Cut onion into half moon slices
3) Chop vegetables (peeled sweet potato, peeled rutabaga, peeled parsnip, carrot, and radishes) into 3/4 inch cubes
4) Chop bacon into 1/2 in pieces
5) Combine vegetables, onion, and bacon in a shallow roasting pan or cookie sheet with edgesIMG_3270
6) Sprinkle with salt and pepper and toss to combine
7) Cover with foil
8) Bake for 10 minutes
9) While the vegetables are roasting, prepare the chicken. If using chicken breasts, put them in a plastic zip loc bag and flatten them to 3/4 in thick. If using chicken thighs, no flattening is needed.
10) Zest lemon
11) Chop fresh rosemary
12) Mince garlic clove
13) Combine lemon zest, rosemary, and garlic and run your knife through them together a few timesIMG_3280
14) Once 10 minutes is up on veggies, uncover the pan and mix the veggies. Push chicken pieces down into the pan, removing the large veggies from underneath them. (The occasional onion or bacon under the chicken won’t do anything but good.)IMG_3281
14) Sprinkle chicken with salt, pepper, and lemon/rosemary/garlic mixture
15) Roast chicken and veggies uncovered for 30-40 minutes
16) Serve with lemon wedges from the lemon you zested
IMG_3284
Details

Prep time: Cook time: Total time: Yield: 4 servings plus leftovers for lunches


Someone else’s great idea: Green bean fries

Originally written 9/18/17

My garden went gangbusters in late August so we reached a point where we had more green beans than we knew what to do with.  I stumbled on this recipe and made it on a night where Beast had a bunch of friends over to watch a big fight.  I wound up making I don’t know how many batches because as soon as I set them down they were gone.

Breading is always a little labor intensive but I find when I get it set up in a row, it goes much faster.

I served mine with ranch dressing and had them in a metal can with a cute red napkin for a little color.

Do you have any go to recipes for dealing with the excess from your garden?  If so, please share!

Happy cooking!

Perfect High-altitude buttermilk biscuits with Colorado peach jam

Moving to Colorado throws you for a loop when you are used to baking by following standard recipes.  Shortly after I moved here, I quickly learned to search for high altitude recipes so I didn’t wind up with an deflated and not so tasty treat.

Several years ago, I got it into my head that I needed to be able to make biscuits from scratch.  This might have been due to some pregnancy induced nesting urge.  Who knows.  I had a hard time finding a high altitude biscuit recipe that worked perfectly each time so I started playing with a recipe I found until it was just right.  I played with the amount of baking soda, baking powder, and oven temperature until the recipe below was created.  Which means for a few months we had biscuits ALL THE TIME.

I finally got it right and the recipe below is our go to when people are over for breakfast or when we’re wanting to have a nice lazy morning making breakfast as a family.  It is probably the recipe I get asked for and share the most.  Now that I have kids, they really enjoy helping me make and cut the biscuits.

This mound of butter is when we were tripling the recipe for a crowd.

Apple butter or honey are perfect spreads for these biscuits.  But is it also fun to make something of your own.  We usually get a box or two of Colorado peaches each summer and I love to make peach jam to go on these biscuits, toast, etc.  This warm peach jam recipe is a perfect way to use a couple of peaches to add something seasonal, fresh, and sweet to a breakfast staple.  Start the jam first and while it simmers, make the biscuits.

Happy cooking!

print recipe

High Altitude Buttermilk Biscuits

This is the recipe I have spent the most time experimenting with and getting just right. My kids love to help me make these and you’ll find them sitting on the kitchen counter putting butter in the mixer many Saturday mornings.

Ingredients

  • 2 cups flour
  • 1 Tablespoon baking powder
  • 1/4 teaspoon baking soda
  • 1 Tablespoon sugar
  • 1 teaspoon salt
  • 1/3 cup (cut into small cubes) cold butter
  • 3/4 cup buttermilk

Instructions

1. Preheat oven to 400 degrees

2. Whisk dry ingredients in stand mixer bowl

3. Cut butter into small cubes

4. Turn stand mixer on medium speed

5. Add one cube of cold butter to the mix at a time until all butter is in the bowl

6. Dribble buttermilk down the side of the stand mixer while still running

7. Stop adding buttermilk when the mixture is a sticky dough ball and all dry ingredients have been absorbed

8. Flour hands and flat surface

9. Ball up mixture and knead two to three times on floured surface

10. Spread dough ball out to 1 inch thick with hands or rolling pin

11. Dip a glass or biscuit cutter into flour and use it to cut biscuits of desired size

12. Put biscuits on cookie sheet and bake for 12 minutes

Details

Prep time: Cook time: Total time: Yield: 8 biscuits or so, depending on size


Colorado Peach Jam

This recipe could probably be made a million different ways with whatever fruit is seasonal or whatever combination you would like to try. Start this recipe first and them start the biscuits. You’ll be able to finalize this one while the biscuits cook.

Ingredients

  • 2, pealed and diced Colorado peaches
  • 1 cup water
  • 1/4 cup sugar

Instructions

1. Peal and dice peaches 

2. Put all ingredients in saucepan on medium heat, turn to low once simmering

3. Simmer uncovered for 15 minutes

4. Stir occasionally and add 1/4 cup water as needed, if sauce becomes too thick

5. Once peaches are cooked through and sauce is thick, smash peach pieces with a fork or potato masher

Details

Prep time: Cook time: Total time: Yield: 2 cups

Dinner inspiration: My neighbor’s arugula pesto

We have the best neighbors in the entire world.  Seriously.  This is for a variety of reasons but one that I hold especially dear:  They share things from their garden.

The other day we were in the backyard trading gardening stories with our neighbor (we have both just moved into new houses and this was both of first years for these gardens).  He then asked if we would like to try his arugula pesto.  Absolutely!  In two minutes I was holding a mason jar full of love from his garden.  He said it was a mix of home grown arugula, lemon juice, parmesan, olive oil, and pine nuts.  I don’t know the recipe so that’s why I’m not sharing it here.

With that in hand, I was inspired to make a pasta dish with some love from my garden too.

I marinated chicken thighs in basil, olive oil and pepper then grilled them.  Roasted sliced zucchini (from my garden) and asparagus (cut into one inch pieces) mixed with olive oil, pepper, and salt at 350 for 15 minutes and then high broil for 2 minutes.  Boiled up some shell pasta and mixed it all together with the pesto.  Plated it up and topped it with some shredded parmesan.

I can always tell how well Beast likes something by if he runs to claim the leftovers for lunch the next day.  As we were clearing the table, he was already scraping the bowl into a “to go” container.

This is easily re-creatable even if you don’t have lovely neighbors giving you jars of heavenly made pesto.  Grab a jar of pesto at the grocery store or make your own.  Serve with roasted veggies, pasta, and grilled chicken and you’ve got it.

Happy cooking!

Lemony salmon and Greek zucchini pasta

During the week, getting dinner on the table ASAP is often my goal but Sundays are different.  Sundays we can take our time prepping and cooking which means my Sunday suppers are often a bit more involved.

Bear is currently on a salmon kick where the boy, I kid you not, can sit down and eat a half pound of salmon or more.  At age 3 1/2.  It is kind of impressive.  And I absolutely love cooking him something he gets so excited about so I’ve been trying to make sure he gets his salmon every 1-2 weeks.

Lucky for me, our local grocery chain King Soopers does an awesome fish program called “Easy for You” where they put the seafood of your choice in an oven ready foil bag with tons of great seasonings and herbs.  It even tells you on the back of the bag the appropriate temperature and time to cook it based on the weight.  Our favorite right now is salmon with butter, dill, lemon, and the lemon pepper seasoning.  For 2 lbs of salmon, you bake it at 380 degrees for 40 minutes and it comes out perfect every time.


When cooking fish, it is always better to err on being underdone and sticking it back in the oven for a few minutes.  If you overcook it, it will often have that not so pleasant fishy taste that makes people think they don’t like fish.  In reality, they don’t like overcooked fish.


If your grocery store doesn’t offer a similar program, you could make your own foil envelope and just top the salmon with the following:

  • 2 Tablespoons of butter
  • Healthy shakes of lemon pepper seasoning
  • Slices of lemon
  • Sprigs of dill

While my salmon was cooking, I got to work on the pasta.

Ingredients:

  • 3 zucchini (small, spiralized to about twice as thick as typical spaghetti)
  • 1 bunch of asparagus (cut into 1 inch pieces)
  • 1/2 cup of pitted kalamata olives (cut in half lengthwise)
  • 1 cup cherry tomatoes (cut in half)
  • 1/2 cucumber (cut in slices and quartered)
  • 1 small jar pesto sauce

Directions:

  1. Spiralize and cut all veggies, keeping the zucchini noodles and asparagus separate from everything else.
  2. Put a large pot of boiling water on to boil.
  3. When the salmon has 5 minutes left to cook, drop the zucchini noodles and asparagus in the boiling water.
  4. Boil for 3 minutes.
  5. While the asparagus and noodles are boiling, stir the pesto into the other veggies with some freshly cracked pepper.
  6. Drain the asparagus and noodles in a large colander.
  7. Push down on the asparagus and noodles with a paper towel or clean dish towel to release some of the excess water.
  8. Mix the asparagus and noodles into the other veggies.
  9. Plate the pasta with the salmon and top the pasta with a little bit of crumbled feta.

My kids can’t tell the difference between zucchini noodles and regular pasta, especially once it has a sauce on it, so this is a great way to sneak some extra veggies in.  When serving this up, I made sure Bear got extra tomatoes and Beast had as few olives as possible since those are their preferences.  I left the feta off the top of the kids’ plates because my kids gag on “weird white stuff” (feta, cottage cheese, and mashed potatoes).  Not a battle I wish to fight since they are great about eating virtually everything else including their veggies.  The feta and cottage cheese I can understand but I think they are really missing out on the mashed potatoes.

This went over well in our house and I hope it will in yours as well!

Happy cooking!

Cinnamon apple pork chops with sweet potatoes

My kids (and hubby) love their sweets.  This is a dinner that to them tasted like dessert but I felt fine about it because there was plenty of fruit and veggies in every bite.  Ladybug decided that forks should be optional during this meal because she was able to shovel in the goodness with her hands better. 

Ingredients:

  • Pork chops
  • 1 c (or one juice box) apple juice
  • 2 Tablespoons cinnamon
  • 1/4 c honey
  • 2-3 sweet potatoes
  • 2 apples
 Directions:
  1. Night before (or right when you get home) put pork chops, apple juice, honey, and cinnamon in a large ziplock bag to marinate the meat. Cooking/Meal planning tip:  Even if I haven’t meal planned, I like to know what I am making for dinner by the night before.  That way I can make sure any meat needed is thawed and ingredients are on hand.
  2. Get home from work and put a cartoon on for the kids.
  3. Peel and cube sweet potatoes (~1/2 inch cubes are perfect)
  4. Cook the sweet potatoes with some coconut oil or olive oil for about 10 minutes, stirring frequently.
  5. Preheat the grill.
  6. While sweet potatoes are cooking, cube the apples (I leave the peel on)
  7. Once the sweet potatoes are starting to soften, add the apples and a little more oil. 
  8. Put the meat on the grill, keeping the marinade.
  9. Pour 1 cup of the marinade into the sweet potatoes and apples and cover.
  10. Flip the meat when it is no longer sticking to the grill (about 4 minutes)
  11. Pull the meat off the grill when again, it is no longer sticking to it and let it rest while the apples and sweet potatoes finish cooking.                                                                                                        

  12. Once the sweet potatoes and apples are softened, pull off the heat.  
  13. Serve in a bowl with the sweet potatoes and apples in the bottom and the pork chop on top.  We served in a bowl because the sweet potatoes and apples mixed with the apple juice and cinnamon makes a yummy sauce that is great to dip the cut up pork chop in.

Beast was excited because he thought we were going to have enough for a great lunch for him the next day.  But Ladybug kept going back for seconds, thirds, fourths and beyond (I actually lost track).  His lunch whittled away to a tiny snack by the time she was done.

As I was originally typing this, Bear is looking over my shoulder and he just said, “That was good!”

Definitely something we will be having again!

Same meal different way:  So sometimes we get sick of making the same things the same ways.  An alternative way to make this meal would be to slice the apples and cook them with cinnamon, a little water, and honey.  Then roast the sweet potatoes with a little olive oil and cinnamon.  Grill the pork chops as recommended above.  Then the plate looks different with each item separated but it is essentially the same thing.

Go-To Pasta Meat Sauce

This is the recipe for my Go-To Pasta Meat Sauce that I seriously make almost every week.  Without fail.  My family loves it.  It makes plenty for dinner and next day lunches too.  And the kids have no idea how many veggies they are eating.  Seriously, no idea.  


Ingredients:

  • 1 lb. ground beef or Italian sausage
  • 1 onion, chopped
  • 1 cup carrots, chopped
  • 1 jar of your favorite pasta sauce
  • 1 box of your favorite pasta
  • 1 Tbsp Italian Seasoning
  • 1 Tbsp minced garlic
  • Red peppers flakes (to taste)
  • Red wine for deglazing the pan
  • Parmesan cheese

Other possible additions:

  • Chopped zucchini
  • Chopped fresh spinach
  • Chopped red peppers
  • Canned pumpkin Seriously, you can’t taste it at all and it adds lots of vitamins and fiber.  And gets that can out of the fridge that you had to use half of for another recipe.

Directions:

  1. Put on a Daniel Tiger episode for the kids.  Choose their sermon.  Today you need to hear about sharing…
  2. Open red wine and pour taster glass.  You have to make sure the bottle is good before using it in a recipe.  Seriously.  Really this might be step one depending on the work day…
  3. Put on your favorite Pandora mix.  I recommend “A Dinner Party Ambience Radio” or “Indie Singer-Songwriters Radio.”
  4. Put on a big pot of water to boil for the pasta.
  5. Brown meat.
  6. While meat is cooking, chop onion and carrots.
  7. Once meat is browned, drain if there is a pourable amount of fat.
  8. Add onions and carrots and cook about 5 minutes (until onions are tender)
  9. While onions and carrots are cooking, chop anything else you will be adding and get it ready.  Tonight I added zucchini so here is where I chopped that.
  10. Add the zucchini or any other fresh veggies.
  11. While the additions are cooking, add the Italian Seasoning, red pepper flakes, and garlic.
  12. If at any time the bottom of the pans starts to get crusty technical term deglaze the pan with a glug of wine.  Once the wine is in, scrape the bottom of the pan to get all the good stuff off flavor off the bottom.
  13. Add in any other additions.  Tonight I added canned pumpkin since I had still had one can leftover in the pantry from all the pumpkin recipes I was making in the fall.
  14. Cook until the carrots are tender.
  15. Add the pasta sauce and turn heat down to low to simmer.
  16. Depending on how long it is going to take Beast to get home, I’ll sometimes simmer the sauce stirring it occasionally for 15-30 minutes or just go straight to serving.  You can be flexible.  
  17. Once I have “Find iPhone” stalked Beast and determined he is 10 minutes from home, I drop the pasta and cook according to the directions on the box.  
  18. Once the pasta is cooked, drain and add to the pot of sauce.  I have toddlers so we use a lot of penne or other small pastas that they can more easily eat than spaghetti.
  19. Stir to get sauce in every nook and cranny.
  20. Top with parmesan cheese or “sprinkle cheese” as it is known in my house and serve.
  21. Watch your children eat carrots, spinach and other goodness they have no idea about.  Evil cackle quietly to yourself.

So there you have it.  This is not anything fancy but it goes over really well with my family and tastes great for lunch the next day.  It is also really flexible and you can make it different depending on what you have on hand.


Hope it works for you too!

Go-To Taco Meat

This is the recipe for my Go-To Taco Meat that I seriously make almost every week.  Beast looks at my weekly menu more on that later for it each week and will ask if it isn’t there when I’m making it next.  This recipe makes plenty for dinner and next day lunches too.  And the kids have no idea how many veggies they are eating.

Go-To Taco Meat
Ingredients
  • 1 pound ground beef or turkey
  • 1 onion, chopped
  • 1 cup carrots, chopped
  • 1 red pepper, diced
  • 1 can fire roasted diced tomatoes
  • 1 can diced green chilies
  • 1 can black beans
  • 1 box hard taco shells
  • 1 packet taco seasoning
  • few glugs your favorite beer
  • topping shredded cheddar cheese
  • 1 cup zucchini, chopped (optional)
  • 2 cups fresh spinach, chopped (optional)
  • sour cream for topping (optional)
  • shredded lettuce for topping (optional)
  • fresh tomatoes, diced  for topping (optional)
Instructions
1. Put on Sesame Street for the kids
2. Open a beer and take a swig. You have to make sure the bottle is good prior to using it in a recipe. Seriously.
3. Put on your favorite Pandora mix. I recommend “Today’s Indie Radio.”
4. Brown meat.
5. While meat is browning, chop onion, red pepper, carrots and any other veggies. (Do carrots first since you add them next.) 
6. Once meat is browned, drain (if there is a pourable amount of fat).
7. Add carrots and cook for 5 minutes.
8. Add other vegetables and cook about 5 minutes (until onions are tender).
9. Add seasoning packet to the meat and stir.
10. If at any time the bottom of the pan gets crusty (technical term) deglaze the pan with a glug of beer. Once beer is in the pan, scrape the bottom of the pan to get all the good stuff (flavor) off the bottom.
11. Add can of green chilies.
12. Drain and rinse can of black beans.
13. Add can of black beans.
14. Serve meat in taco shells with cheese, sour cream and other toppings. Can serve with a side of spanish rice (prepared box).
15. Watch your children eat veggies they have no idea about. (Evil cackle quietly to yourself.)
Details

Prep time: Cook time: Total time: Yield: 6-8 servings

Taco meat when it is finished.

So there you have it.  This is not anything fancy but it goes over really well with my family and tastes great for lunch the next day.  It is also really flexible and you can make it different depending on what you have on hand.


Hope it works for you too!

Happy cooking!